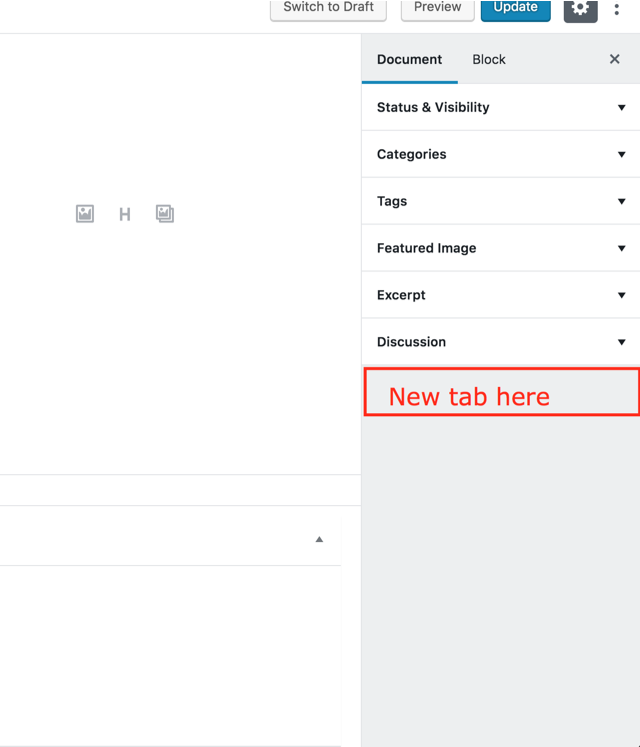
如何在古腾堡的“文档”下添加新面板

我正在尝试在文档选项卡下添加一个新的组件面板,例如类别、特色图像等。

解决方案
他们现在添加了PluginDocumentSettingPanel SlotFill。
const { registerPlugin } = wp.plugins
const { PluginDocumentSettingPanel } = wp.editPost

const PluginDocumentSettingPanelDemo = () => (
    <PluginDocumentSettingPanel
        name="custom-panel"
        title="Custom Panel"
        className="custom-panel"
    >
        Custom Panel Contents
    </PluginDocumentSettingPanel>
)
registerPlugin('plugin-document-setting-panel-demo', {
    render: PluginDocumentSettingPanelDemo
})
add_meta_box可以解决问题,但前提是您添加值为'side'的context参数:
add_meta_box(
    'box-id-here',
    'Box Title Here',
    'createBoxHtml',
    'post',
    'side' ); // <-- this is important
啊哈,两天一无所获!
旧答案
根据这个教程,我们可以添加自定义侧边栏并使用自定义表单输入填充它。
这是 React JSX 版本中的一个工作示例。 这增加了一个元字段country :
const { registerPlugin } = wp.plugins;
const { PluginSidebar } = wp.editPost;
const { TextControl } = wp.components;
const { withSelect, withDispatch } = wp.data;

// Customized TextControl
const CustomMetaField = withDispatch( ( dispatch, props ) => {
    return {
        updateMetaValue: ( v ) => {
            dispatch( 'core/editor' ).editPost( {
                meta: {
                    [ props.metaFieldName ]: v
                }
            });
        }
    };
})( withSelect( ( select, props ) => {
    return {
        [ props.metaFieldName ]: select( 'core/editor' ).getEditedPostAttribute( 'meta' )[ props.metaFieldName ]
    };
} )( ( props ) => (
    <TextControl
        value={props[ props.metaFieldName ] }
        label="Country"
        onChange={( v ) => {
            props.updateMetaValue( v );
        }}
    /> )
) );


// Our custom sidebar
registerPlugin( 'custom-sidebar', {
    render() {
        return (
            <PluginSidebar
                name="project-meta-sidebar"
                title="Project Meta">
                <div className="plugin-sidebar-content">
                    <CustomMetaField metaFieldName="country" />
                </div>
            </PluginSidebar>
        );
    },
} );
在 PHP 中,在init hook 中注册元字段:
register_meta( 'post', 'country', [
    'show_in_rest' => TRUE,
    'single' => TRUE,
    'type' => 'string'
] );
我知道:
这仍然不是必需的解决方案,但差不多。
您可以将此代码添加到您的 function.php。 此代码创建新选项卡并将文本字段添加到此选项卡。 文本字段像 post_meta 表中的自定义字段一样保存到数据库中,您可以像默认 WP post meta 一样输出它。
1. 创建标签。
2.创建自定义文本字段utm_post_class
3. 网站输出使用$utm = get_post_meta( $post->ID, 'utm_post_class', true );
//Article UTM Link
add_action( 'load-post.php', 'utm_post_meta_boxes_setup' );
add_action( 'load-post-new.php', 'utm_post_meta_boxes_setup' );

function utm_post_meta_boxes_setup() {
    add_action( 'add_meta_boxes', 'utm_add_post_meta_boxes' );
    add_action( 'save_post', 'utm_save_post_class_meta', 10, 2 );
}

function utm_add_post_meta_boxes() {
    add_meta_box(
        'utm-post-class',
        'Настройки UTM',
        'utm_post_class_meta_box',
        'post',
        'side',
        'default'
    );
}

function utm_post_class_meta_box( $post ) {
    wp_nonce_field( basename( __FILE__ ), 'utm_post_class_nonce' );?>

    <div class="components-base-control editor-post-excerpt__textarea">
        <div class="components-base-control__field">
            <label class="components-base-control__label" for="utm-post-class">UTM ссылка (необязательно)</label>
            <input type="text" name="utm-post-class" id="utm-post-class" class="edit-post-post-schedule" value="<?php echo esc_attr( get_post_meta( $post->ID, 'utm_post_class', true ) ); ?>">
        </div>
    </div>
<?php }

function utm_save_post_class_meta( $post_id, $post ) {

    if ( !isset( $_POST['utm_post_class_nonce'] ) || !wp_verify_nonce( $_POST['utm_post_class_nonce'], basename( __FILE__ ) ) )
        return $post_id;

    $post_type = get_post_type_object( $post->post_type );
    if ( !current_user_can( $post_type->cap->edit_post, $post_id ) )
        return $post_id;

    $new_meta_value = ( isset( $_POST['utm-post-class'] ) ? $_POST['utm-post-class'] : '' );
    $meta_key = 'utm_post_class';
    $meta_value = get_post_meta( $post_id, $meta_key, true );

    if ( $new_meta_value && '' == $meta_value )
        add_post_meta( $post_id, $meta_key, $new_meta_value, true );
    elseif ( $new_meta_value && $new_meta_value != $meta_value )
        update_post_meta( $post_id, $meta_key, $new_meta_value );
    elseif ( '' == $new_meta_value && $meta_value )
        delete_post_meta( $post_id, $meta_key, $meta_value );
}
您现在可以使用较新的useSelect和useDispatch自定义挂钩。 它们类似于withSelect和withDispatch ,但利用 React 16.8 中的自定义钩子来获得更简洁的开发体验:
(此外,使用@wordpress/scripts ,因此导入来自 npm 包而不是直接来自wp对象,但两者都可以。)
import { __ } from '@wordpress/i18n';
import { useSelect, useDispatch } from '@wordpress/data';
import { PluginDocumentSettingPanel } from '@wordpress/edit-post';
import { TextControl } from '@wordpress/components';

const TextController = (props) => {
  const meta = useSelect(
    (select) =>
      select('core/editor').getEditedPostAttribute('meta')['_myprefix_text_metafield']
  );
  const { editPost } = useDispatch('core/editor');
  return (
    <TextControl
      label={__("Text Meta", "textdomain")}
      value={meta}
      onChange={(value) => editPost({ meta: { _myprefix_text_metafield: value } })}
    />
  );
};

const PluginDocumentSettingPanelDemo = () => {
  return (
    <PluginDocumentSettingPanel
      name="custom-panel"
      title="Custom Panel"
      className="custom-panel"
    >
      <TextController />
    </PluginDocumentSettingPanel>
  );
};

export default PluginDocumentSettingPanelDemo;
除了像往常一样注册您的元字段:
function myprefix_register_meta()
{
    register_post_meta('post', '_myprefix_text_metafield', array(
        'show_in_rest' => true,
        'type' => 'string',
        'single' => true,
        'sanitize_callback' => 'sanitize_text_field',
        'auth_callback' => function () {
            return current_user_can('edit_posts');
        }
    ));
}
add_action('init', 'myprefix_register_meta');
并确保如果用于自定义帖子类型,则在supports数组中包含custom-fields :
'supports' => array('title', 'editor', 'thumbnail', 'revisions', 'custom-fields'),
希望这有帮助。
你可能还喜欢下面这些文章
 WordPress小说主题wpnovo,支持多语言、付费阅读、VIP会员功能的精美小说模板
//demo.imwpweb.com/wpnovo/多设备支持主题支持PC和移动端界面,独立设置,互不干扰。移动端首页(右)图:小说页面PC端和移动端的展示付费订阅主题支持付费订阅功能,支持付费单章订阅、整本小说订阅模式。
 WordPress自动内链插件 WPKAL ,网站全自动增加锚链接必备插件
什么是内链内链,顾名思义就是在同一网站域名下的内容页面之间的互相链接(自己网站的内容链接到自己网站的内部页面,也称之为站内链接)。自动内链工作原理简单来说,我们设定一些词表以及词表对应的链接,比如词是wordpress插件,链接是http
 WordPress 敏感词违禁词屏蔽插件 WPWJC 介绍与下载
这款插件的核心功能就是一点:找出文章中的违禁词、敏感词等措辞不当的词语,替换成你设置的更合适的词或者直接替换“*”号。请注意,需要同时下载站长工具箱和违禁词屏蔽插件,安装插件时也需要两个插件同时安装。
 WordPress 文章自动配图、缩略图插件 WPAC 介绍与下载
2、自动生成的图片并非真实在磁盘中的图片,而是动态生成的,如果保存到磁盘会占用大量空间,这个空间没必要浪费,因此修改主题代码,直接将缩略图的地址改为wpac自动生成的缩略图地址是一个非常好的方案。
 WordPress 相关文章插件 wprec
wprec利用相似度算法计算每篇文章之间的相似度,找到与当前文章最相似的一些文章,展现在文章底部作为相关文章。我们知道,相关推荐插件推荐的原理是根据当前文章的特征(文章的高权重标签),从文章库中召回相关文章,再根据相关性评分,最后选出To

